Saturday, March 27, 2010

Serendipity and the search for the perfect LA skyline

For some months now, my friends and I have been looking for the perfect place to take pictures of the LA skyline. I often see beautiful, unobstructed shots — when I'm driving on the freeway. Last week, we decided to take a photo field trip to Chinatown in downtown LA. Instead of taking the freeway, we drove surface streets, and, where we least expected it, we saw this great view of LA from the far side of the Los Angeles River.

The hazy morning sky made the skyline less than perfect, but it was good practice. (Fortunately, so-so pictures can always be made more fun in post-processing.)
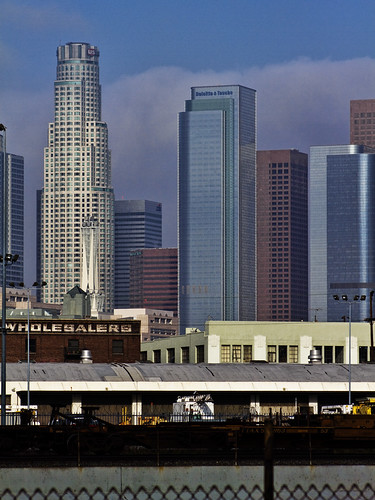
LA skylineThe LA skyline

LA City Hall
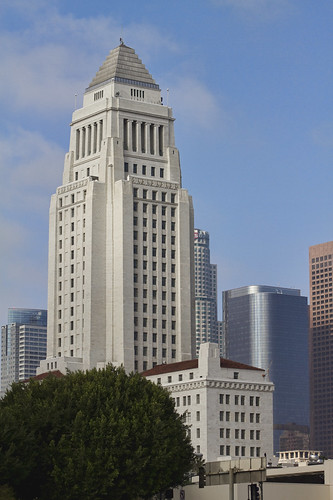
LA City Hall (taken later in the morning from Olvera Street)

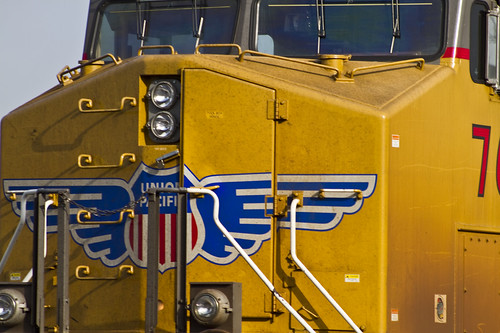
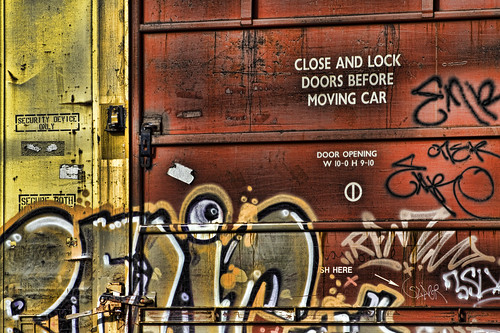
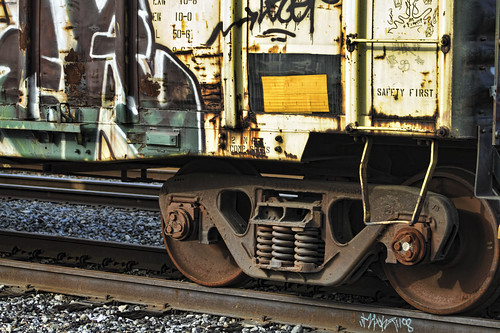
The second serendipitous part of the morning is that this view of the skyline occurred in the middle of several train tracks. I love everything about trains: the engines, the tracks, all the graffiti on the trains...
TrainA train passed through unexpectedly. I wasn't ready for the first engine. This engine is actually at the end of the train.

LA skyline and train
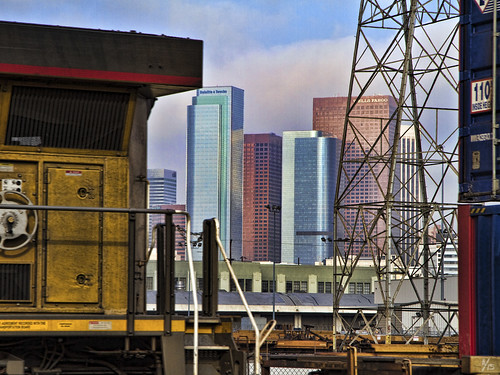
My challenge was, could I catch the skyline (in focus) in the gaps between the cars? Out of 10 or so attempts, I caught one shot I was happy with.

Next, we turned our attention to our immediate surroundings. This is where the haze in the air came in handy, providing the perfect atmosphere for the standing trains.
Trains
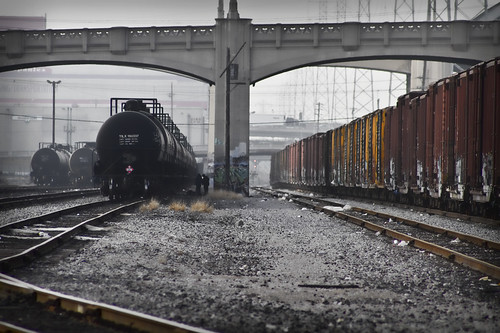
I didn't notice the two men standing next to the train until I got home.

Trains
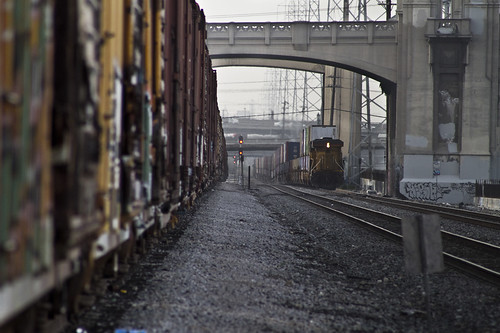
I like the glow of the train traffic lights in the distance.

LA skyline
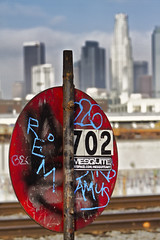
I liked how this sign stood out in front of the blurred skyline.

And of course, the graffiti...
Train graffiti

Train graffiti

What did I learn?
  • Sometimes you just get lucky. I didn't anticipate finding this location, or having a train pass through while we stood there.
  • Sometimes you don't get lucky. The hazy sky wasn't very appealing. I'll have to go back to this location on a clear future morning.

Saturday, March 13, 2010

Baseball, kids, and black and white

IMG_1806At bat
Today I went to the park in search of feet. ("Feet" are the theme of the week for Downey Daily Photo.) And I discovered feet galore, mostly very small feet attached to very cute 5-year-olds learning to play baseball.

Kids at this age are great fun to watch. They're able and willing — and they have the attention span of a gnat. The parents were equally fun to watch. There were no temper tantrums, no yelling, just lots of laughter as the kids hit the ball and forgot to run, or danced and twirled in the outfield.

It wasn't until I got home and started reviewing my pictures that I noticed that the bright green grass and all the other colors and clothes were pretty distracting. So I changed most of the pictures from color to black and white.

For example,consider this before-and-after pair of pictures.
IMG_1814 copyColor version
IMG_1814Same picture, in black-and-white

As fun as her pink helmet is, I find it very distracting. My eye is drawn to the helmet first, and her face last. I like the black-and-white version better. What do you think?

So once I started converting, I didn't stop.
IMG_1843This youngster swung, hit, and watched. And forgot to run to first base.

IMG_1825Is the goal to get the ball — or to get the runner out? These three boys just wanted the ball. At one point, I wondered how any team ever managed to get three outs.

IMG_1813Is he bored or patient?

IMG_1807Finally, some action!

IMG_1839A swing and a miss!

IMG_1836Nice swing.

IMG_1830Chit chat at first base? Or is she covering her ears and singing, "I can't hear you"?

IMG_1831"I say he's out!"

IMG_1805One of the exceptions to the black-and-white format? Grass stains.

Over in the big kid's section, I liked this image of the boy on the bench. Rookie mistake: I didn't even notice that someone else walked into the frame until I got home.

IMG_1846On the bench

What did I learn?
  • As much as I like intense color in my pictures, sometimes I prefer the simplicity of black and white.
  • Don't forget to check the rest of the frame before pressing the shutter release. (Some lessons have to be learned over and over again.)

Friday, March 5, 2010

Why do I take pictures?

I’ve been thinking a lot lately about why I take pictures, and I’ve come to the conclusion that there are two reasons.

First, like most people I take pictures to record my memories of people and events. I’ve done this since my first pocket camera on my first trip to Europe. The desire to preserve my stories is why I have so many shelves of photo albums, detailing my daughter’s life and nearly every trip I’ve ever taken.

The following pictures tell the story of an event during Erinna's high school graduation trip to Cancun. On a day trip to the ruins at Chichen-Itza, we stopped for a swim in a nearby giant sinkhole.
Sinkhole near Chichen-Itza
The sinkhole was gorgeous and deep. People were lined up to dive off the perch at one side, and Erinna joined them.


Diving at a sink hole
Erinna did a beautiful dive — that tipped slightly as she neared the water.


Bruises
The result? Huge bruises on the backs of both legs.

The second reason is a little more complex. I take pictures because, for me, taking a picture completes my enjoyment. C. S. Lewis wrote in "Reflections on the Psalms," “I think we delight to praise what we enjoy because the praise not merely expresses but completes the enjoyment; it is its appointed consummation." This is how I feel about photography — it is the consummation of my experience.

Lewis further says, “…just as men spontaneously praise whatever they value, so they spontaneously urge us to join them in praising it: ‘Isn’t she lovely? Wasn’t it glorious?’” This too is a part of my photography — “See? Isn’t it beautiful?” By "it," I mean the subject in the picture, not the picture itself. The picture is the means for me to share something that I find awesome, beautiful, or simply intriguing.


My cat Prune

The green green eyes of my cat Prune.


Sunlight in the redwoods

The sunlight filtering through the trees in the California redwoods.


The bell tower in Split, Croatia

The bells ringing in the bell tower in Split, Croatia.

What did I learn?
  • The best photographers can combine both of these goals in their picture-taking. I'm not there yet.
  • Each time I take a picture, I need to be aware of what goal I'm trying to achieve. Not doing so often causes me to miss achieving either goal. Focusing on one goal greatly increases my chances for success.

Saturday, January 23, 2010

Getting out of the rut

Have you ever felt like there's nothing exciting to take pictures of? I have. I got into a rut where I felt that the only things worth taking pictures of were the things you have to take a vacation to get to—Paris, Rome, all the famous travel destinations around the world. But as I looked at the work of photographers I admire, I kept noticing that many of the photos I liked best were of everyday things— a reflection in a puddle, curtains in a window, people's feet in a subway.

Two things happened next. First, I read about The Best Camera Is the One That's With You, a book by photographer Chase Jarvis. Jarvis's idea is that good pictures come from keeping your eyes open and being ready, not from having the latest and greatest equipment. In addition, Jarvis says, “There are at least 10 great pictures within 10 meters of you right now,” wherever you are, whatever you're doing. I felt challenged to find the beauty where I am instead of where I would rather be.

Second, I started a blog, along with two friends, called Downey Daily Photos. Our goal is to post a picture each day that is taken in our hometown of Downey, California. Now, Downey isn't Paris. Or Rome. But once I started looking, and more importantly, once I started looking while I was walking rather than driving, I started to see all kinds of picture-worthy things.

Here are some of the things I've noticed during the last month.


What did I learn?
Getting out of this rut involves a change of mind instead of a change of scenery.

Wednesday, January 13, 2010

Wedding bells

About 6 months ago, my niece asked me to photograph her wedding. I've never done a wedding before. I'm a travel and nature photographer—you know, where the subject typically doesn't move before you have a chance to get everything right. And when I do take people pictures, I like to take candid shots. But she reassured me that they'd be happy with anything I did, so I agreed.

IMG_5861

So I read up on wedding photography, asked my friend to assist me, made lists, gathered all my equipment together, and generally thought I was ready. And the rehearsal reassured me. Things seemed under control, not too hard. And we used the time after the rehearsal to scout out good group shot locations for the next day.

But the real thing was way harder than I expected. The lists fell to the wayside. People didn't stand in the same places as they did during the rehearsal. There were all these guests to get around. And the group shots were a disaster. We totally overlooked the perfect group shot location, and shot instead into an ugly wall and a too bright sky.

And nothing prepared me for the aftermath. Between us, we had four cameras and took over 6,000 pictures. (The advantages of digital?) So many pictures! And of course lots of pictures that would be really great—if only the sky weren't so washed out, if only her face wasn't in shadow, if only his face didn't look so red in that shot. All things that can be fixed in Photoshop, of course, but each fix adds a little more time to the task.

And so, I let it drag on a bit longer than I should have. Four months later, we're finally through. We got through it, and had fun too. Would I do it again? You bet! The whole adventure gave me the opportunity to participate in my niece's wedding at a level I never would have done otherwise. That alone made it all worth while.

What did I learn?
  • If you're using more than one camera, synchronize the clocks! We could have saved hours and hours in post-processing time if we could have sorted those 6,000 pictures based on the time they were actually taken.
  • Take control of those group shots. Don't expect people to enjoy them, just get it over with as quickly and as efficiently as possible. Tell them where to stand. Tell them when to look at you and smile. (Trust me, candid shots of groups almost never get everyone looking good at the same time.)
  • Focus on quality, not quantity. Of course, this one probably comes with experience and practice, as you get better at getting the good shots.
  • Wear clothes that blend into the background. That way you won't take pictures of the bride and groom—and your assistant's pink blouse.

Thursday, December 24, 2009

Panning – shooting moving subjects

Last weekend I took my dog Ivan to the local dog park, and decided to experiment with panning. Panning is a technique where you follow a moving subject with your camera, producing a picture with a relatively sharp subject and a blurred background. Panning can emphasize the speed and motion of your subject.

To pan, use a relatively slow shutter speed. When your subject approaches, follow the subject with your camera. Press the shutter as the subject crosses in front of you, and continue to follow the subject after the shutter closes. This will help you maintain a smooth shot from start to finish.

This was my first experiment with panning, and I still need more practice. Here are some of the best from the day.

For comparison, a non-panned shot, taken at 1/640 shutter speed.
IMG_7630


This is Ivan and a friend. It was hard to predict when and which direction he would go.
IMG_7634


This dog was chasing a ball with more consistency, so I tried out some shots on him.
IMG_7679

What did I learn?
  • Panning works best when the subject is moving in a relatively straight line at an angle perpendicular to your position. Subjects that are moving erratically can result in shots that are rather messy. The perpendicular position provides the greatest emphasis to your subject’s speed.
  • Panning takes a lot of practice. Even when you master this technique, you’ll end up with a lot of duds.
  • Panning is easier when you can anticipate the action. The dog park is not the ideal setting for practicing. For practice, cars on a busy street would be easier and more predictable.
For more information about panning, see Mastering Panning – Photographing Moving Subjects.

Sunday, December 13, 2009

When there’s not enough light

I hate carrying around a tripod. Even the little ones like the Gorillapod (Joby GP3 Gorillapod SLR-Zoom Flexible Tripod for Digital SLR Cameras). But these days it seems like I always want to take pictures when there’s not enough light. Low light means slow shutter speeds, where even a little bit of camera shake can turn your picture into a bunch of wavy lines. What can you do to reduce camera shake when you can’t (or don’t want) to use a tripod?

  1. Hold your camera steadily. Keep your elbows close to your side. If you have a DSLR camera, support your camera lens with your other hand.
  2. Brace yourself. Find something to lean against. Lean your elbows on a convenient surface. Or sit, and lean your elbows on your knees.
  3. Brace your camera. Lean the camera against a pole or wall.
  4. Hold your breath when you click the shutter.

Recently, I walked around the Naples (Long Beach, California) canals to see the Christmas lights. I brought along my camera with my fastest (and lightest) lens, just to see what I could capture. Using the tips above, I was able to get several clear shots of the lights and decorations. (I also got a lot of fuzzy shots, especially of the reflections in the water.)

What did I learn?

  • My camera is slow. It’s old. I can’t wait until next year when I’ve saved enough for the next generation of digital camera.
  • Even so, remembering these tips helps. About a third of my pictures turned out in focus, even though most of the shots were taken at a shutter speed of less than 1/20.