Thursday, December 24, 2009

Panning – shooting moving subjects

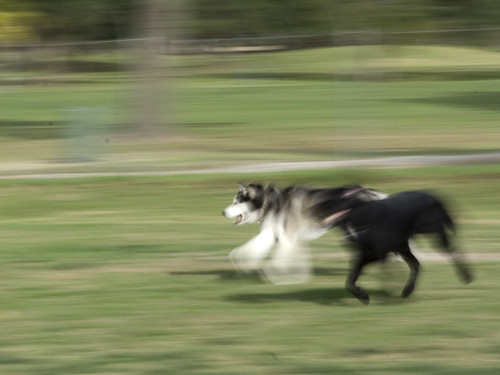
Last weekend I took my dog Ivan to the local dog park, and decided to experiment with panning. Panning is a technique where you follow a moving subject with your camera, producing a picture with a relatively sharp subject and a blurred background. Panning can emphasize the speed and motion of your subject.

To pan, use a relatively slow shutter speed. When your subject approaches, follow the subject with your camera. Press the shutter as the subject crosses in front of you, and continue to follow the subject after the shutter closes. This will help you maintain a smooth shot from start to finish.

This was my first experiment with panning, and I still need more practice. Here are some of the best from the day.

For comparison, a non-panned shot, taken at 1/640 shutter speed.
IMG_7630


This is Ivan and a friend. It was hard to predict when and which direction he would go.
IMG_7634


This dog was chasing a ball with more consistency, so I tried out some shots on him.
IMG_7679

What did I learn?
  • Panning works best when the subject is moving in a relatively straight line at an angle perpendicular to your position. Subjects that are moving erratically can result in shots that are rather messy. The perpendicular position provides the greatest emphasis to your subject’s speed.
  • Panning takes a lot of practice. Even when you master this technique, you’ll end up with a lot of duds.
  • Panning is easier when you can anticipate the action. The dog park is not the ideal setting for practicing. For practice, cars on a busy street would be easier and more predictable.
For more information about panning, see Mastering Panning – Photographing Moving Subjects.

Sunday, December 13, 2009

When there’s not enough light

I hate carrying around a tripod. Even the little ones like the Gorillapod (Joby GP3 Gorillapod SLR-Zoom Flexible Tripod for Digital SLR Cameras). But these days it seems like I always want to take pictures when there’s not enough light. Low light means slow shutter speeds, where even a little bit of camera shake can turn your picture into a bunch of wavy lines. What can you do to reduce camera shake when you can’t (or don’t want) to use a tripod?

  1. Hold your camera steadily. Keep your elbows close to your side. If you have a DSLR camera, support your camera lens with your other hand.
  2. Brace yourself. Find something to lean against. Lean your elbows on a convenient surface. Or sit, and lean your elbows on your knees.
  3. Brace your camera. Lean the camera against a pole or wall.
  4. Hold your breath when you click the shutter.

Recently, I walked around the Naples (Long Beach, California) canals to see the Christmas lights. I brought along my camera with my fastest (and lightest) lens, just to see what I could capture. Using the tips above, I was able to get several clear shots of the lights and decorations. (I also got a lot of fuzzy shots, especially of the reflections in the water.)

What did I learn?

  • My camera is slow. It’s old. I can’t wait until next year when I’ve saved enough for the next generation of digital camera.
  • Even so, remembering these tips helps. About a third of my pictures turned out in focus, even though most of the shots were taken at a shutter speed of less than 1/20.

Monday, November 30, 2009

Adding interest to those wide-angle shots

practice 014One of the characteristics of a wide angle lens is that the lens enlarges anything in the foreground, as you can see by the foot in the picture to the right. You can take advantage of this and add impact to your pictures by placing objects of interest in the foreground of your wide-angle shots.


To try this out, I took some experimental shots around my house. The first set of pictures shows the vegetable garden. By stepping up closer before taking the second shot, I emphasized the flag and provided a focal point to an otherwise blah scene.

garden

The first shot in the second set of pictures shows a typical pool scene. By getting in lower and closer to the cue ball, the second shot emphasizes the player's point of view.

pooltable

Here are a couple of real-life examples.

IMG_6705

IMG_4446

What did I learn?
  • I looked through my old photos and found I don't use this technique nearly often enough. Often, a landscape shot can be improved by adding some interest in the foreground.
  • It occurred to me that this same technique can be applied to the typical tourist shot ("Look, Mom, here I am in front of the Eiffel Tower!"). These shots often don't do justice to either the people or the site. Instead, try putting some distance between the person in the shot and the site, get up close to the person, and then shoot the scene with both the person and the site in the frame. I used a remote to do something similar in the following picture showing my friends and me in front of the Seattle skyline.
    IMG_6351

Wednesday, November 18, 2009

Thanksgiving rehearsal

This year, Joan and Allison decided that one Thanksgiving wasn't enough, so we had a Thanksgiving rehearsal. As long as we were rehearsing, I figured I'd rehearse the pictures.

They decorated...
IMG_7149 IMG_7150

And cooked...
IMG_7157

IMG_7154 IMG_7145

I was thankful for our new ovens that fit perfectly into the space left by the ones that stopped working.
IMG_7141

What did I learn?
  • A lens hood is a great tool out in the sun. But you have to take it off when you use the flash. (Notice the shadow below the ovens?)
  • With or without flash, it's hard to get the white balance right in incandescent lighting. But I think that the color in the shots without flash is truer to the actual lighting. No flash means higher ISO settings to eliminate blur, and therefore more graininess.
  • I was in a hurry to take the pictures, so I used the on-camera flash instead of my (new) external flash. The new flash would probably have resulted in better color. I need to rehearse it between now and the real Thanksgiving next week.

Sunday, November 15, 2009

Fall leaves and pumpkins

I love fall — the colors, the pumpkins, and all the leaves lying in piles in the yard.

Actually, all the leaves are lying in other people's yards, since the only things that our trees drop are pine needles. If I want to take pictures of fall leaves, I either have to crawl around someone else's yard, or fill a bag with leaves to take back home. I chose to bring some leaves home.

Fall leaves and pine cone

Fall leaves

The other thing I love about fall is the pumpkins. If you wait until the morning after Halloween, you can get a great bargain on all the pumpkins you want.

Pumpkin still life

Pumpkin stem

What did I learn?

Macro photography requires a tripod, or at least something to rest the camera on or against. Getting the focus right seems to be my toughest challenge these days.

Wednesday, January 21, 2009

1 to 98: up close and personal

My friend Allison and I decided to start with close-up shots using a backdrop and her new lighting system.

The first thing I noticed is that I'm not a good judge of what's in focus when I'm shooting up close. (I was aiming for the front berry.) Using manual focus might help with this.


The next thing I need to do is bracket my shots to vary the depth of field. A narrow depth of field is OK for the berries. But this didn't work as well for Erinna's eyes. I think this shot would work better with both eyes in focus.


The last thing I learned in this session is that Prune does not like being kept out of the center of attention. She saw the spotlight and headed straight for it.